C# WinForms CheckBox Control

The CheckBox control is found in the System.Windows.Forms namespace within the System.Windows.Forms.dll. In this blog post I am referring to the CheckBox control that is available in C# .NET-Core (.NET 6.0) with Visual Studio 2022 (although this code example might still work OK with older .NET versions).
The purpose and function of a CheckBox control is to provide the user with a measure of interaction capabilities with a program by allowing the user to toggle a checked state of the control which triggers a callback event. The CheckBox control is use to provide the user with an option, such as True/False, Yes/No, On/Off, Selected/NotSelected, etc... You can add any number of CheckBox objects to your Forms.
The CheckBox control is capable of displaying an image, text, or both.
CheckBox and RadioButton controls have a similar function: they both allow the user to choose from a list of options. With the CheckBox control, the user can pick a combination of multiple options at the same time, where as in contrast the RadioButton controls allows a user to choose just one item from a list of mutually exclusive options.
The CheckBox control is capable of appearing as either a typical CheckBox or as a Button, depending on which Appearance property value is set. The available Appearance property values can either be Normal or Button (default is Normal).
The FlatStyle property determines the style and appearance of the control. If the FlatStle property is set to FlatStyle.System then the user's operating system determines the appearance of the control so that it looks uniform and standard on that particular operating system. It is worth nothing that whenever the FlatStyle property is set to FlatStyle.System then the CheckAlign property is ignored and the control is displayed using the ContentAlignment.MiddleLeft or ContentAlignment.MiddleRight alignment. If the CheckAlign property is set to one of the right alignment options then the control is displayed using the ContentAlignment.MiddleRight alignment, otherwise it is displayed using the ContentAlignment.MiddleLeft alignment.
The CheckBox control is capable of having two or three states, depending on which ThreeState property value is set. You use the Checked property to get or set the value of a two-state CheckBox, and use the CheckState property to get or set the value of a three-state CheckBox. If the ThreeState property is set to True then the Checked property will return True for either a checked or indeterminate state.
For indeterminate states, if you use a CheckBox to show the state of something and that something is True then the CheckBox will be checked. If the state of that something is False then the CheckBox will be unchecked. However, if the state of that something is both True AND False then the CheckBox will be indeterminate. For example, if you select some text in a RichTextBox that is bold, if all of the text that you selected is bold then the CheckBox that represent bold text will be checked, and if none of the text selected is bold then the CheckBox will be unchecked, however if some of the selected text is bold and some of it is not bold then the CheckBox will be indeterminate.
Example Source Code
This example uses three CheckBox controls, and two Label controls.
To add the CheckBox control to your form, you can double click on its name (i.e. CheckBox) as listed in the Toolbox window panel within the Form editor window. Alternatively, you can single click on it and then drag and drop it onto your form, to position it more closer to where you want it to be positioned at. Once it is added to the form then it will appear on the forms surface area having default CheckBox control values.
After you have added the CheckBox control to your form, then once you select it then you can view and edit that objects property values in the Properties window within the Forms editor window, where you can then change the controls Name, Text, and other properties as you desire.
In the following example, using the Form editor I added three CheckBox control objects to my Form, and then I adjusted the Text property value of each so that they each display some text string next to their check box area. I also added two labels to the form, and then adjusted the text value of one to display "Select All That Apply:" and then renamed the other label "feedbackLabel":
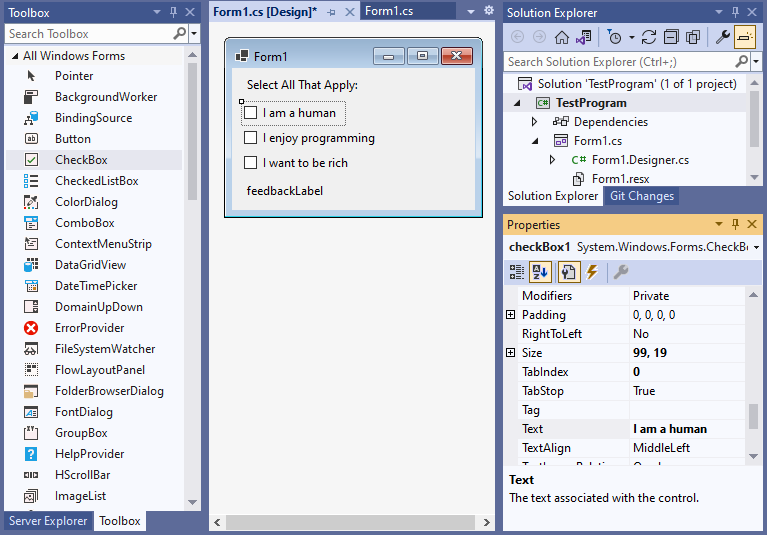
From the Form editor, I double clicked on each of the CheckBox objects that I had just added to the Form. Doing so automatically creates and links a callback method to that controls CheckedChanged event into that forms .cs source code file, which I can then program some action to be performed whenever the checked state is changed.
In the following example, when the program is running and someone checks one of the check boxes then the feedbackLabel is updated to display how many check boxes are checked:
namespace TestProgram
{
public partial class Form1 : Form
{
public Form1 ()
{
InitializeComponent ();
}
private void Form1_Load (object sender, EventArgs e)
{
// init default values
updateFeedback ();
}
private void checkBox1_CheckedChanged (object sender, EventArgs e)
{
// update the feedback label
updateFeedback ();
}
private void checkBox2_CheckedChanged (object sender, EventArgs e)
{
// update the feedback label
updateFeedback ();
}
private void checkBox3_CheckedChanged (object sender, EventArgs e)
{
// update the feedback label
updateFeedback ();
}
// function to count the number of checkboxes checked and update the feedback label
private void updateFeedback ()
{
// init default values
int totalItemsSelcted = 0;
// see if checkbox 1 is checked
if(checkBox1.CheckState == CheckState.Checked)
{
// increment count
totalItemsSelcted++;
}
// see if checkbox 2 is checked
if (checkBox2.CheckState == CheckState.Checked)
{
// increment count
totalItemsSelcted++;
}
// see if checkbox 3 is checked
if (checkBox3.CheckState == CheckState.Checked)
{
// increment count
totalItemsSelcted++;
}
// give feedback
feedbackLabel.Text = Convert .ToString(totalItemsSelcted) + " Of 3 Items Selected" ;
}
}
}There are several different ways I could have written the source code shown above. One way is that I could have adjusted the Property values of each CheckBox control object on the Form to point to the same callback Event method, instead of using the default of having each CheckBox object point to its own callback method individually, especially since all three of these CheckBox objects callback methods are essentially doing the exact same thing, which is to update the feedback label. Also, in the example above I had each of the callback methods call a separate function that then updates the label, so that I didn't have to repeat the code over and over again three times in each of the three callback methods.
In the code example below I have adjusted the CheckBox objects Property events to link all three CheckBox objects to the exact same callback method, and am performing the update in it directly instead of in a separate function:
namespace TestProgram
{
public partial class Form1 : Form
{
public Form1 ()
{
InitializeComponent ();
}
private void Form1_Load (object sender, EventArgs e)
{
//
}
private void checkBox_CheckedChanged (object sender, EventArgs e)
{
// init default values
int totalItemsSelcted = 0;
// see if checkbox 1 is checked
if(checkBox1.CheckState == CheckState.Checked)
{
// incrament count
totalItemsSelcted++;
}
// see if checkbox 2 is checked
if (checkBox2.CheckState == CheckState.Checked)
{
// incrament count
totalItemsSelcted++;
}
// see if checkbox 3 is checked
if (checkBox3.CheckState == CheckState.Checked)
{
// incrament count
totalItemsSelcted++;
}
// give feedback
feedbackLabel.Text = Convert.ToString (totalItemsSelcted) + " Of 3 Items Selected" ;
}
}
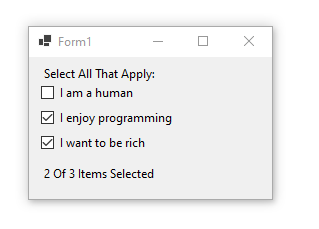
}When you run the above examples and click on their CheckBox's then you should see something similar to the following:
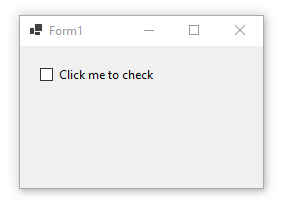
Alternatively still, you can also instantiate a new instance of the CheckBox class object as a variable and then add it to the forms control collection manually within the programs source code. If you create and add the object manually within the programs source code instead of by drag and dropping the object in the Form editors window, then you will need to also set all of its properties and callback events manually as well.
Below is an example source code of doing just that:
namespace TestProgram
{
public partial class Form1 : Form
{
public Form1 ()
{
InitializeComponent ();
}
private void Form1_Load (object sender, EventArgs e)
{
// instantiate an instance of a new checkbox
CheckBox newCheckBox = new CheckBox();
// add the CheckedChanged event and tie it to a method
newCheckBox.CheckedChanged += new System.EventHandler(this .checkBox_CheckedChanged );
// set the new checkbox properties
newCheckBox.Name = "checkBox1" ;
newCheckBox.Left = 20;
newCheckBox.Top = 20;
newCheckBox.Text = "Click me to Check" ;
newCheckBox.AutoSize = true;
// add the new checkbox to the form
this.Controls.Add(newCheckBox);
}
// the method to handle the checkbox checked change event
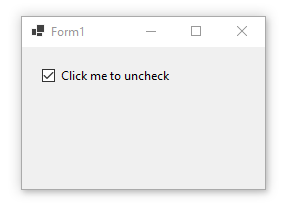
private void checkBox_CheckedChanged (object ? sender, EventArgs e)
{
// see if the checkbox is checked or not
if (sender != null )
{
CheckBox thisCheckBox = (CheckBox)sender;
if (thisCheckBox.CheckState == CheckState.Checked)
{
thisCheckBox.Text = "Click me to UnCheck" ;
}
else
{
thisCheckBox.Text = "Click me to Check" ;
}
}
}
}
}When you run the above examples and click on their CheckBox's then you should see something similar to the following:
Final Thoughts
Thank you for reading, I hope you found this blog post (tutorial) educational and helpful.